
“This worked much better than more recently published guides.”
How to quickly set up Time Machine server on Ubuntu Server 12.04/14.04/16.04 and Debian without using extra repositories, unnecessary packages and redundant configuration. Backing up tested on OS X 10.6 Snow Leopard, OS X 10.8 Mountain Lion, OS X 10.9 Mavericks, OS X 10.10 Yosemite, OS X 10.11 El Capitan. If you have a problem, you might be able to find a solution in the comments section below the article.
Update: if you try this in CentOS, replace apt-get with yum where necessary.
If you need to install a new drive, follow the guide on Ubuntu Help.
1. That’s all you need to install:
sudo apt-get install netatalk avahi-daemon2. Create a new user for Time Machine, for example, danny:
sudo adduser danny3. Create a folder which will contain the backup. It doesn’t have to be located under /home or called “tm”.
mkdir -R /home/danny/tm/
sudo chown -R danny /home/danny/tm/
4. Backup the configuration file:
sudo mv /etc/netatalk/AppleVolumes.default /etc/netatalk/AppleVolumes.default.old5. Create a new configuration file and open it for editing:
sudo nano /etc/netatalk/AppleVolumes.defaultPaste the following line which sets default settings for all shares:
:DEFAULT: options:upriv,usedotsThen add this line to share a folder with danny:
/home/danny/tm "Danny's Time Machine" options:tm volsizelimit:300000 allow:dannyDo not touch “options:tm”! Obviously “volsizelimit:300000” limits the share to 300000 MiB (~314GB). (Finder will show “314GB available” when connected). Remove it if you want.
Important! Make sure you’ve replaced /home/danny/tm with the actual path you chose in step 3. Otherwise you’ll be getting OSStatus 2 errors later on.
6. Restart netatalk:
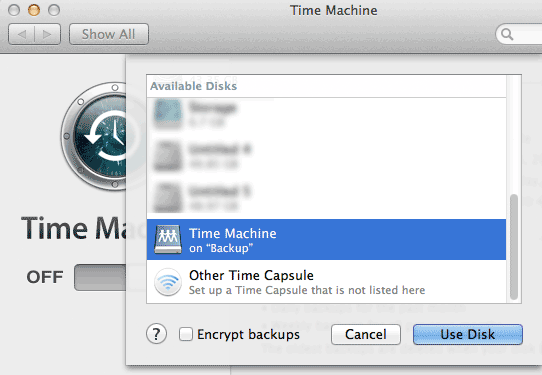
sudo service netatalk restart7. Connect to your server using Finder on your Mac: in “Go” menu, press “Connect to server…” (or ⌘+K). In server address field type afp://IP.of.your.server/ then press “Connect”. If all is well you’ll be asked for login and password (the ones you set in step 2). Once connected, open System Preferences > Time Machine, click “Select Disk…” and select your server under “Available Disks”:
 Once again you’ll be asked for the login and password, after that you can disconnect from the share in Finder if you want, because Time Machine will open a new connection.
If you use Mavericks/Yosemite and you get “Check the server name or IP address, and then try again” error, run the following on your server:
cd /usr/lib/netatalk
sudo mv uams_dhx2.so uams_dhx2.so.broken
sudo ln -s uams_dhx2_passwd.so uams_dhx2.so
sudo service netatalk restart
(Thanks Gary Corcoran!)
* * *
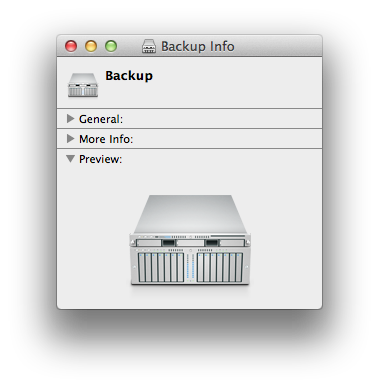
Bonus! Make your server appear as Xserve in Finder:
1. Open /etc/avahi/services/afpd.service for editing:
sudo nano /etc/avahi/services/afpd.service2. Paste this:
<?xml version="1.0" standalone="no"?>
<!DOCTYPE service-group SYSTEM "avahi-service.dtd">

<service-group>
    <name replace-wildcards="yes">%h</name>

    <service>
        <type>_device-info._tcp</type>
        <port>0</port>
        <txt-record>model=Xserve</txt-record>
    </service>
</service-group>
3. Restart avahi-daemon:
sudo service avahi-daemon restart
* * *
Troubleshooting
(1) If you can’t connect to your server at all, try turning off the firewall if any, and see if connection goes through. If so, turn the firewall back on and try opening port number 548.
If your firewall is ufw, the following will turn it off:
sudo ufw disable…and these commands turn it on and open port 548:
sudo ufw enable
sudo ufw allow 548
(2) If you get OSStatus 2 errors, make sure the Time Machine directory (e.g. “/home/danny/tm”) is writable by your Time Machine user (e.g. danny). You can check that by running the following command which tries to create a file called test:
su danny touch /home/danny/tm/testIf you get an error, repeat step 3.
(3) If avahi-daemon does not start after rebooting the server (so the server doesn’t re-appear in Finder’s sidebar), change AVAHI_DAEMON_DETECT_LOCAL from 1 to 0 in /etc/default/avahi-daemon (more information in my post on ServerFault). Note that if it never appeared in the first place, probably it has a different problem.
(?) If you’re facing a different problem, try catching possible error messages.
On your OS X computer, open Console.app, click “Show log list” to open the sidebar and select “All Messages” there.
On your Linux server:
tail -f /var/log/syslog(Ctrl + C to stop).
Then try to connect and see if any suspicious or error messages appear. If so, mention them while asking for help via comments or forums.
Thanks alot man! It works great!
I did this, and I’m getting an OSStatus Error 2 message, stating “Time Machine can’t access the backup disk”.
Any ideas?
Is your Time Machine share writable? (Can you upload a regular file via Finder into it?)
Hi. I’m getting the same error.
Did you figured how to solve it?
The permissions are ok. I tried to copy a file into the shared folder using the same credentials and works ok..
Thanks.
hey dear,
i did the same, but when i type user and password required by timemachine configuration i get this error message:
There was a problem connecting to the server “lab.local”.
Check the server name or IP address, and then try again. If you continue to have problems, contact your system administrator.
let me know.
thanks
Can you connect to your server via AFP?
Hello,
I have the same issue as Marco, can’t seem to get authentication to work. Any tips?
Tried via AFP and still getting the same error.
I have this same error. Did you manage to fix it? What did you do?
Don
no, i can’t.. connection failed
Any suggestion?
Thanks works fine,
For those trying to figure it out I just simply did
mkdir /home/timemachine/backup
chmod 777 /home/timemachine/backup
gave permissions for my username.
Thank you for this post. I know there are a few comments from those that had problems, but I found it worked a treat using a big fat disk attached to an O2 Joggler running Ubuntu 12.10, with Time Machine running on Macs using OS X 10.7 Lion and 10.9 Mavericks.
For both my back-ups I made sure that the only thing being backed up on the first round was a small folder. So you use Time Machine’s options dialog to exclude almost everything, then bring them in on subsequent back-ups. This just gets that first back-up done, so what follows is incremental.
It did seem to take a long while at first to “locate” the backup disk, even though the share was listed instantly in the list of available disks for backup, it took ages to locate when actually backing up. To any who loose their nerve at this point, I suggest waiting before tweaking your settings and seeing if it completes. Thereafter it is quick.
I haven’t tried restoring in earnest yet. But while I was migrating data from another backup on USB to a client’s mac, my Ubuntu Time Capsule was presented as a possible source of migration data in Migration Assistant.
Thanks for the nice description.
I run an iptables-based firewall on my fileserver – what ports need opened for this setup?
I see that three different protocols are used; samba, netatalk, avahi. I am guessing here but I would look for the ports these protocols use.
I got this to work and it great but I had two questions.
First the initial backup is so long, I was considering to plug in my drive for the initial backup; can I then use that same backup on the server?
Second can I do all this for another Mac device?
I’ve heard that people do this, but I don’t know if there are any pitfalls.
If you want to backup another computer, you can either:
(1) Repeat step 6 on another Mac and use the same Linux user/password. This way, two Macs will be backed up to the same Time Machine share.
This is easier, but not very secure: if you’re using Mac #1 and your friend is using Mac #2, you and your friend will be able to access files of each other through the backups.
(2) If you want your Macs backed-up into separate shares, repeat step 2 and step 4. In Step 4 obviously you may skip the “Paste the following line” part because you should already have that line in your AppleVolumes.default file.
This is working great for me. Thanks for the instructions. Question though: does anybody know if there any way to read the backed up files from the Ubuntu machine if the Mac dies? I’ve been looking at instructions such as
http://superuser.com/questions/238297/accessing-time-machine-backup-from-windows-linux-laptops
but the folder names and structure mentioned there don’t seem to be the same. It seems that things are stored differently.
Thanks,
I’m not sure I understand the part about folder names. My guide does not impose any specific folder structure.
Keep in mind that OS X stores its backup in a “.backupd” file, that is a container with Apple’s proprietary HFS+ filesystem. By default Ubuntu cannot read HFS+ and thus it cannot read your “.backupd” container, until you specifically tune it to do so with additional packages and hacks, as suggested by your link.
thanks, so simple. I had Tiger backing up to Ubuntu, but when I went to Snow Leopard it stopped and I couldn’t get it working again until I came across this. Now the mac is backing nicely and I go access back to those original backups from the tiger days!
Pingback: CentOS: Instalar o Netatalk 3.1.0 (Time Machine) | Blog do TadeuCruz
This is great help. Thank you.
Andrew Zimmerman, Thanks for the solution!
I think the below commands are needed to be run on Mavericks, they were for me anyway,
===================
BEGIN WORKAROUND
===================
cd /usr/lib/netatalk
mv uams_dhx2.so uams_dhx2.so.broken
ln -s uams_dhx2_passwd.so uams_dhx2.so
That wasn’t necessary for me. Working just fine in mavericks.
For the record: I also needed to apply the workaround from Gary Corcoran to make it work on Mavericks (on a new system). Thanks, Gary!
FWIW: On a new Yosemite iMac, I also needed Gary’s workaround. Thanks Gary!
Thank you.. Your solution works for me too!! Cheers Gary and Dae.. You Rock!!
Pingback: Jeff Beard » Blog Archive » Store Time Machine Backups on an Ubuntu Server - Blog.blog
If you getting the “OSStatus Error 2 message” message with an external drive try not auto-mounting the drive but instead use a system wide mount by editing fstab or using pysdm to do that.
This is great. I have everything working (Yosemite) however ,when I try to connect to the volume it will not connect. I tried logging in with the user ID I setup for time machine and the password did work. I see the drive I even have the icon changed to the server, but it will not connect to the drive. I’m sure it’s a ID10T error but any input would be great – Thank you.
Sorry password did NOT work.
Does what it says on the tin: “without using extra repositories, unnecessary packages and redundant configuration”. Took less than 5 minutes to set up. Confirmed on Ubuntu 14.04.1 LTS and Yosemite. Even added –no-install-recommends to the apt-get install command to skip some more packages that are apparently unneeded.
This guide helped me set up a Time Capsule share and add AFP to my NAS.
Thank you very much!
Simple, clear and… IT WORKS on 14.04.
Thanks for the guide! Mac is being backed up right now. An OSStatus 2 error was happening when first trying. Then came the realization of an ID10T error of actually pasting /path/to/shared/folder instead of creating, setting permissions and inputting my own path :). Thanks again!
Thanks Ray, I’ve updated my post to include this step.
Thanks so much for this! I’m running Yosmite and couldn’t get my time machine to work with by CentOS box, after following this, the backups are working! Saved me some funds for sure!
Hi All,
I also get this error:
Check the server name or IP address, and then try again. If you continue to have problems, contact your system administrator.
Is there anyone who got this solved?
Don
Is your server on your local network or remote? Is it reachable via other programs, e.g. does it respond to ping? Have you tried disabling firewalls if you use any? E.g. “sudo ufw disable”
Hi,
Yes it’s reachable, just the afp isn’t.
In time machine I can see the time capsule share and when I choose it, it prompts me to login. With correct credentials I get the error explained above and with wrong credentials it tells me wrong username or pass.
Don
1. Can you check if the shared directory (in my article:
/home/danny/tm/) is readable by the user you created in step 2?2. Do any messages appear in /var/log/syslog on your server when you try to connect with correct credentials?
You could try before connecting:
It says ownership:
user: tm
group: tm
0755
the syslog comes up with this:
Mar 21 20:20:27 thedonn afpd[8217]: ===============================================================Mar 21 20:20:27 thedonn afpd[8217]: INTERNAL ERROR: Signal 11 in pid 8217 (2.2.2)
Mar 21 20:20:27 thedonn afpd[8217]: ===============================================================
Mar 21 20:20:27 thedonn afpd[8217]: BACKTRACE: 3 stack frames:
Mar 21 20:20:27 thedonn afpd[8217]: #0 /usr/sbin/afpd(netatalk_panic+0x1f) [0x7fa66a6bf8bf]
Mar 21 20:20:27 thedonn afpd[8217]: #1 /usr/sbin/afpd(+0x549bc) [0x7fa66a6bf9bc]
Mar 21 20:20:27 thedonn afpd[8217]: #2 /lib/x86_64-linux-gnu/libc.so.6(+0x36d40) [0x7fa66900fd40]
Here’s what I found on the interwebs:
http://sourceforge.net/p/netatalk/bugs/414/
Worth trying, I guess.
You did not mention firewall. There’s still a chance that its a firewall issue even if you see the share in Time Machine.
No firewall is switched off
Cheers mate for your help!! that worked.
And again I’m very sorry apparently this was mentioned before but I must have done something wrong. This time round it worked!!
Super! Great! Awesome!
No prob! So it was a firewall issue? If so, you could try re-enabling the firewall (sudo ufw enable) and opening port 548 (sudo ufw allow 548).
Sorry no, I ment to comment on the uams part.
That worked en the previous answer on this blog was:
===================
BEGIN WORKAROUND
===================
cd /usr/lib/netatalk
mv uams_dhx2.so uams_dhx2.so.broken
ln -s uams_dhx2_passwd.so uams_dhx2.so
So that is what worked for me!! Cheers mate!
Great, thanks! Now I can update my post.
Hi, I have a question about
7. Connect to your server using Finder (username “danny”). Open System Preferences > Time Machine, click “Select Disk…” and select your server under “Available Disks”:
How am I supposed to connect to my server?
– I connected to it via the “shared” tab on the side (It had my server’s name and icon) and used my username and password.
– I could see the shared folder I made.
– I can see it as a “shared folder” (I guess that’s what it is) when I look in finder at all of my drives. It has 314.57GB free.
So it looks like that all worked….BUT
When I open Time Machine to set it up, I can’t see the bloomin’ “drive”! I can only see my local bootcamp partition and “Other AirPort Time Capsule”
I’m running Yosemite 10.10.2.
Any help would be greatly appreciated!
Hi Marley, while in Finder, press Cmd + K. A dialog window will appear, in its server address field type in afp://ip.address.of.your.server/ and press “Connect”. If everything’s ok it will ask you for login/password, use the ones you set up in step 2. Once connected, go to Time Machine settings and find the newly connected share.
Holy cow,
Thanks for the fast reply!
It connects, but the outcome is the exact same as before.
Sidenote: I had to put “afp://ip.address.of.your.server:548/”
to connect.
Is the connected share writable? Can you make a new folder or save a file on it?
I can indeed.
Oh wow, I figured it out!
I did something stupid.
Step 5: “options:tm” Without thinking replaced with the name of my folder thinking “tm” was for your folder name. Then I used my brain…
Thanks for the help!
Thanks for reporting back! You’re right, I should use a different folder name as an example. Added a warning to the article for now.
Hello
I’m not sure what you meant by this:
7. Connect to your server using Finder (username “danny”)
However, I skipped this and instead just opened up Time Machine directly. It detected my server share and backup worked fine (I did the step with Avahi).
I have OSX 10.10 Yosemite and did not get any “Check the server name or IP address, and then try again” error,”. So I didn’t need that workaround.
Thanks for the comment, I’ve reworded step 7.
Thanks for the post! Worked great.
Hi
Thanks for this tutorial. I have installed everything and it works fine. The backup is running as I type.
You might want to edit step 3 as the chown command also needs sudo for most users.
A few issues. To make time machine work, I need to connect to my server (Xerxes) over afp:// but then I cannot see my other shares. Is it possible to connect to the same server using both afp:// and smb:// at the same time? When I try, it opens the smb shares but does not show them under the shared item in Finder. It also appears to stop the backup when I do it as the afp:// appears to shut down.
I am tying to set time machine up on a network server that serves a series of shares over samba as OSX has now moved to smb2 as default. I am sure I used to run smb and afp together in Ubuntu but for some reason it does not appear to be working for me now.
Can you offer any suggestions?
Geoff
Hi Geoff,
thanks for the correction to step 3. I’ve switched to OpenMediaVault long time ago, so I’m afraid I’m not the best adviser on AFP issues. Try Ubuntu Forums or ServerFault.
To make time machine work, I need to connect to my server
If this is so, then something went wrong. Time Machine should connect automatically, completely on its own, using separately stored login/password. You don’t have to connect to the server manually beforehand.
Thanks Dae.
I think it is a internal networking issue so I will move it to the Ubuntu Forums.
I have selected the time machine disk based on the ip address rather than the machine name this time so I hope that might solve the problem. Not sure why it gave me the two options, probably a hangover from other methods I have tried to get this working that your solution has triggered into action. No need to reply.
Thanks again for your help.
Geoff
Pingback: Apple:Backup/Time Machine solution for an office full of iMacs? – Apple Questions
Thanks for the tutorial. It worked great w/ zero issues.
Gussi
Thank you for the great and easy tutorial!
Works flawlessly on OSX 10.11.1!
Patrizio
… with Ubuntu 14.04.3 as server.
Pingback: Remote linux-based Time Machine using netatalk instead of smb | Craig (Robert) Wright
Thanks so much!
Got it set up in nearly no time on El Capitan / Ubuntu 14.04, works like a charm with three different Macs.
You definitely should add a donate button for this article :)
This guide still works great to this day! Had it set up in no-time at all. All I needed to do in addition to just installing and connecting was to open up the firewall on my Ubuntu server (iptables)
I got this working with a single account, but if I want to apply this to a server meant for my family, can I use groups? So far, I havn’t been able to get this to work.
Hey Dae, thanks for your post! I’m facing a problem of broken authentication due to the fact I’m in a corporate network and trying to use my own login/password (kerberos) so that my personal backups don’t get exposed through a common user/password such as timemachine/timemachine. This means I’m trying to access via afp a subdirectory inside my home for employing it to Time Machine backups. I’ve made a lot of research and it looks like there is some netatalk bug related to UMA’s (and also according to your instructions above). So my question is: is there someone who managed to get this setup running by using a network login rather than a local one? Any help appreciated, thanks. Daniel
Hi Dae, just to let you know that I gave up using a network user and started using a local user according to your instructions (haven’t realized before that I could use any password on account creation). Worked like a charm, thanks again! Best, Daniel.
Works for me – thanks!
Works for me on Ubuntu 16.04 / El Capitan. Thanks!
Works for me on Ubuntu 16.04 / Sierra. Thanks!
Did not work for me with 14.04 / Sierra; updating to 16.04 seemed to fix the issue.
It works, but very slow. ~20gb in 24h . Some one have a clue?
i have the same problem. Very Very slow backups via Gigabit netowrk.
Ftp to my ubuntu server rocks at 100+MB/s
first backup of 350GB took 14h and now an incremental of 600MB takes more then an hour
Anyone ?
Have you tried this?
Works like a charm in Ubuntu 16.04 customized to MythTV 2T drive set up just for TimeMachine. Thanks for this tutorial.
Pingback: Poor man’s Apple Time Machine – ITsaDC
This works great on 16.04 and macOS 10.12.6 (Sierra). This worked much better than more recently published guides.
I tried it on Ubuntu 18.10 it works like a charm. Thank You.
hi!
Is it possible to use encryption?
thanks
Hi, why not?
Hi, did everything, including the “fix”, and on the mac I get error message:
“The version of the server you are trying to connect to is not supported. Please contact your system administrator to resolve the problem.”
In the mac syslog it says:
“8/2/20 2:34:41.648 PM NetAuthSysAgent[2320]: Server uses an unknown login method
8/2/20 2:35:03.767 PM NetAuthSysAgent[2320]: ERROR: AFP_OpenSession – CreateSVEFromURL failed -5997”
Mac is OS X El Capitan Ubuntu is 20.04 desktop
Any Ideas? It seems so close……..but?
-Jim (yes, that’s a real email address)
Pingback: Building NAS with ZFS, AFP/Samba for Time Machine - Avada Technology